If you would like to stream on multiple platforms at the same time (e.g. YouTube, Facebook, Twitch or Instagram) you can use simple solution using virtual private server (VPS) and save your computer performance. This guide is beginner friendly and even people that have never seen a command line should be able to setup their VPS to stream on multiple platforms.
You will need following stuff to setup your stream successfully:
- OBS (Open Broadcaster Software) – streaming software
- VPS (Virtual Private Server)
- accounts in platforms you would like to stream on
VPS log in
1. Order virtual private server VPS ON or VPS SSD. Choose one of the operating system (e.g. Debian 10). It is necessary to buy additional service IPv4. It is free for VPS ON and costs 1 CZK for VPS SSD.
2. You can find VPS login and password in your email.
3. Open command line. Method is going to differ based on your operating system (OS).
- Windows: Press WIN + R buttons. Type cmd in the box and press ENTER.
- Linux: Use Terminal.
4. Log in to your virtual server using following command:
ssh root@IPv4 ADRESS OF YOUR SERVER - example: ssh root@31.31.73.176
5. You will need to confirm fingerprint, if you log in to your VPS for the first time. Type yes to command line and confirm by pressing ENTER.
6. You will be asked to enter VPS password. Warning! Password will not show up in the command line. Type password and press ENTER. You are now signed in your VPS.
Nginx and RTMP module installation
Next step is to install necessary software for your virtual server. You can find step-by-step guide in this chapter.
1. First of all you have to download and install prerequisities. Copy and paste following commands into your command line and press ENTER.
sudo apt-get install build-essential libpcre3 libpcre3-dev libssl-dev zlib1g-dev
2. Download nginx and RTMP module by using the following commands. Copy and paste them into command line and press ENTER.
wget http://nginx.org/download/nginx-1.15.1.tar.gzwget https://github.com/sergey-dryabzhinsky/nginx-rtmp-module/archive/dev.zip
3. Unpack your downloaded files using these commands. You should again copy and paste them into your command line and press ENTER.
tar -zxvf nginx-1.15.1.tar.gzunzip dev.zipcd nginx-1.15.14. Build nginx using following commands. Copy and paste them into command line and press ENTER. Use this guide if you see error message saying “unable to resolve host”. Then you can come back here.
./configure --with-http_ssl_module --add-module=../nginx-rtmp-module-dev

make

sudo make install
5. Your server works! Turn it on by using following commands. Copy and paste them into your command line and press ENTER.
sudo /usr/local/nginx/sbin/nginx6. Test if everything works fine by typing http://IP ADRESS OF YOUR SERVER (E.G. HTTP://31.31.73.176) If you see “Welcome to nginx” you managed to setup your virtual server.
Configuration of nginx and RTMP module
This chapter explains how to configure your VPS to stream on multiple platforms.
1. Open configuration file using following command. Copy and paste it into command line and press ENTER.
sudo nano /usr/local/nginx/conf/nginx.conf2. Copy following text into the very end of your configuration file. You will need URL of RTMP servers and stream keys for each platform you would like to stream on. You can get these in customer administration of your chosen platforms.
rtmp {
        server {
                listen 1935;
                chunk_size 4096;

                application live {
                        live on;
                        record off;
                        push rtmp://live-prg.twitch.tv/app/unique stream key - differs for every account and platform (do not copy bold part)
                        push rtmp://a.rtmp.youtube.com/live2/unique stream key - differs for every account and platform (do not copy bold part); (
                        push RTMP and STREAM KEY 3;
                }
        }
}
3. Press CTRL + X, then Y and finally ENTER to save changes.
4. Nginx is configured. Server has to be restarted to apply changes. Turn it off and then on by using following commands. Copy and paste them into your command line and then press ENTER.
sudo /usr/local/nginx/sbin/nginx -s stop

sudo /usr/local/nginx/sbin/nginx
OBS Settings
1. Download Open Broadcasting Software from a following link.
2. Install and run OBS. Open settings in the left bottom corner of your screen.
3. Click on Stream tab and fill these boxes:
- Service – Custom
- Server – rtmp://YOUR IP ADRESS/live/ (e.g. rtmp://31.31.73.176/live/)
- Stream Key – does not matter (e.g. test)
4. You are ready to start streaming. Do not forget to secure your server by following this guide.
Unable to resolve host
You should ignore this chapter if you did not experience “unable to resolve host” problem.
1. Find out name of your VPS by using command hostname. Copy and paste it to command line and press ENTER. Name of your virtual private server will be typed in the next line. You can also get the name in WEDOS customer administration.
hostname
2. Now add the name to /etc/hosts file as you see on the following picture using following comand. Copy and paste it and then press ENTER.
sudo nano /etc/hosts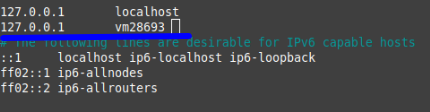
3. IP adress 127.0.0.1 is same for all users. Name vm28693 is unique and it was found out in the last step using command hostname.
4. Unable to resolve host problem is now solved. You can return back to the main tutorial.
Facebook streaming settings
Facebook does not support RTMP, but this restriction can easily be bypassed. Follow this guide if you wish to stream on Facebook.
1. Open nginx configuration file using collowing command. Copy and paste it into command line and press ENTER.
sudo nano /usr/local/nginx/conf/nginx.conf2. We do not use Facebook RTMP server in this case. Copy and paste following lines into the very end of your nginx.conf file. Use adress rtmp://localhost:19350/rtmp/ instead of Facebook RTMP server and then add your unique stream key.
rtmp {
        server {
                listen 1935;
                chunk_size 4096;

                application live {
                        live on;
                        record off;
                        push rtmp://localhost:19350/rtmp/unique stream key - differs for every account and platform (do not copy bold part));
                }
        }
}
3. If you have already copied previous text in the main part of this tutorial, just add following line under the record off line:
rtmp://localhost:19350/rtmp/unique stream key - differs for every account and platform (do not copy bold part);
4. Ngninx has to be restarted to apply changes using following commands:
sudo /usr/local/nginx/sbin/nginx -s stop

sudo /usr/local/nginx/sbin/nginx
5. Install stunnel on your VPS. Copy and paste following command into your command line and press ENTER:
apt-get install stunnel4 -y6. Change ENABLE=0 to ENABLE=1 using the following command sudo nano /etc/default/stunnel4. Just add ENABLE=1 into the file if you cannot find corresponding record. Save changes and exit text editor by pressing CTRL + X, then Y and finally ENTER.
7. Add following records using sudo nano /etc/stunnel/stunnel.conf command.
pid = /var/run/stunnel4/stunnel.pid
output = /var/log/stunnel4/stunnel.logsetuid = stunnel4
setgid = stunnel4

# https://www.stunnel.org/faq.html
socket = r:TCP_NODELAY=1
socket = l:TCP_NODELAY=1

debug = 4

[fb-live]
client = yes
accept = 19350
connect = live-api-s.facebook.com:443
verifyChain = no
8. Save changes and exit text editor by pressing CTRL + X, then Y and finally ENTER.
9. Add stunnel to automatically run at startup using following command:
systemctl enable stunnel4.service10. Restart stunnel using following command:
systemctl restart stunnel4.service11. VPS settings are complete. Continue by setting OBS if you did not do that earlier.
Server security
If you want to secure your virtual private server, you will have to follow guide.
- Turn off nginx if you do not stream using following command.
sudo /usr/local/nginx/sbin/nginx -s stopTo turn it back on before streaming use following command.
sudo /usr/local/nginx/sbin/nginx2. Restric IP adresses that can publish and play your streams. Copy and paste following bold lines into your nginx config file.
rtmp {
    server {
        listen 1935;
        chunk_size 4096;
        allow publish 89.79.80.40 (replace with your own IP adress);
        allow publish 89.74.42.165 (replace with your own IP adress);
        deny publish all;

        allow play 89.79.80.40 (replace with your own IP adress);
        allow play 89.74.42.165 (replace with your own IP adress);
        deny play all;

        application live {
            live on;
            record off;
        }
    }
}
Add bold lines to your config file. Do not forget that IP adresses in the picture above are for illustrative purposes only. Nginx config file was already edited in this part of the tutorial. Add the lines to the same place.